

Consuming HTTP APIs is an indispensable part of web development. For any frontend client to be able to talk to an API, a contract has to be established. This contract, in simple terms, can be split into the following aspects:
- The address of the API, e.g., https://reqres.in/api/users
- The request or path parameters, e.g., https://reqres.in/api/users?page=2 or https://reqres.in/api/users/2.
- The API operation in question, e.g.,
GET,POSTetc. - The request payload schema (if any)
- The response payload schema
- The authorization parameters, which could be header- or cookie-based.
Now, an HTTP API implementation would depend upon the choice of the server side programming language or framework, and the consumption of such an API would change according to the client side programming language or framework. Under the hood, the server and the client are tied together by the above API contract. We could propose all sorts of documentation, discussions or huddles between developers to ensure that everyone adheres to this contract, but history has taught us better.
We know we hate documentation, period, and no amount of discussions, huddles or testing is going to make an integration flawless— there has to be a better way.
Enter the OpenAPI Specification (OAS). This OpenAPI initiative offers an industry standard interface definition language, or IDL. This means even before you start building an API’s business logic, before you test the API for errors, defects or any other lifecycle function, you will design the API’s interface and detail the exact requests and responses your API endpoints will showcase. I could go on and on about the benefits of an IDL, but I’ll leave that to this excellent article.
That all sounds wonderful, but why are we here?
As helpful as these specifications sound, we still have to write the code to integrate with those APIs. Or do we?
Don’t get me wrong, there is absolutely nothing wrong with writing the same boilerplate code over and over again, but…
🗣 The best code is the code I don’t have to write.
You already know what I’m talking about: a client library.
A client library is a collection of code specific to one programming language that makes it easier to use an API.
Under the hood, a client library will still make use of the HTTP APIs exposed by the server, but now the client is abstracted out of the unnecessary boilerplate code. What’s more, client libraries automatically format API responses to match the data types used in the programming language. Together, this vastly decreases the amount of time developers need to get started with an API while also reducing the likelihood that something will go wrong.
Now, this is not a new concept. The idea of creating client libraries has been in the industry for decades. However, with all of the programming languages we use, creating client libraries can be quite a challenge — and that’s not to mention the maintenance that comes with every update to your APIs.
Imagine you’re working with a React SPA, an Android app, an old PHP app and an iOS app. Additionally, you have 10 different systems exposing different sets of REST APIs. Now imagine the life of the developers generating the API clients for all of the APIs across four different stacks. Because you’re not working alone, you’ll have to maintain documentation about those clients and keep all of the clients for the different stacks in sync. Why on earth would anyone volunteer for such work?
That’s why we’re here.
Create a NestJS app to host our REST APIs
It’s not super important to fully understand NestJS; having a general idea of what’s happening will suffice because we are using NestJS as an example. APIs can be written in any server side programming language. We will use the NestJS CLI to bootstrap a NestJS project and get us up and running.
npx @nestjs/cli new open-api-nestjs-serverOnce the project is initialized, we will add some APIs for user management. NestJS works on an MVC pattern. We are adding a controller to host the APIs, a service to do the heavy lifting and DTOs for our models. This is how the user module would look:
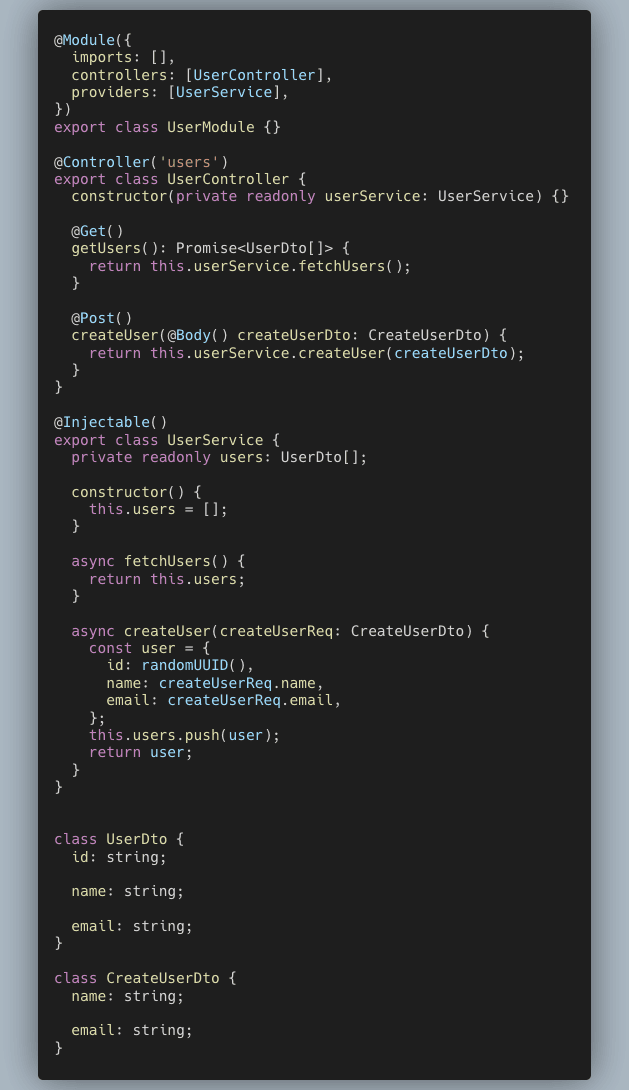
We’re not too fussed about the implementation of the actual user management API; just an in memory stub works fine for us.
Integrate the app with Swagger
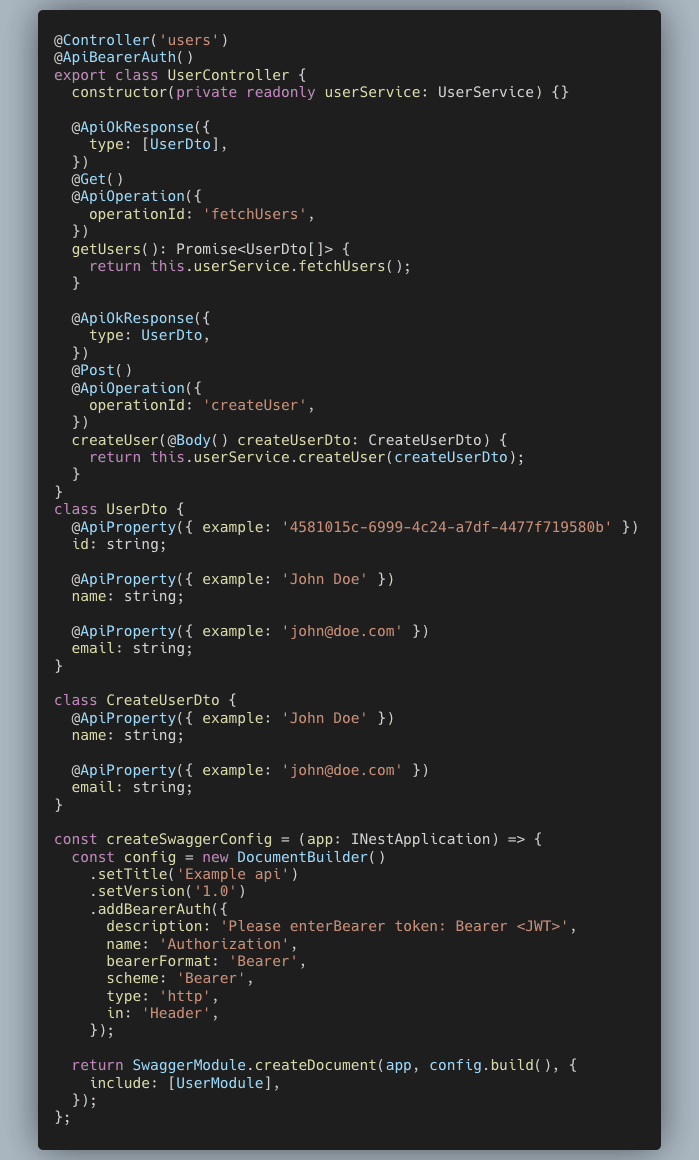
Next, we’ll add Swagger to our application. Once that’s done, we’ll annotate our controller methods and our DTOs with appropriate Swagger annotations. The annotations are self-explanatory, so I won’t go into details about each one. In the end, we’ll add a Swagger config to initialize the default settings. This is the first step to auto-generating information. The updated classes would look like this:
Now the fun starts.
For simplicity, we will maintain api-client inside our server repository itself. Let’s start by creating an api-client directory inside the project. This api-client will be simple node project with the necessary dependencies for auto-generating information. Finally, we’ll publish an npm package from this repository that can be consumed by any browser-based application.
Auto-generate OpenAPI specs for the set of APIs
Because we’ve already added the annotations to our methods, there is no reason for us to maintain the OpenAPI specification separately— we can generate it! All we have to do is compile the NestJS application in a script and export the JSON to a file called index.js.

Note: Swagger has plugins/libraries for almost every server side programming language. There is always a way to generate swagger.json.
Since we need the TypeScript files to be compiled, we’ll point the script to the dist directory. The wiring inside package.json will look like this:
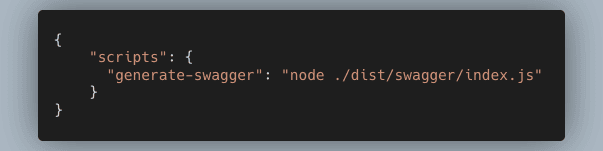
This will generate swagger.json in the API client directory.
Auto-generate a type-safe fetch client to be integrated with a ReactJS frontend
We will use this GitHub repo to generate our JavaScript client. For this example, we are auto-generating a Fetch API client. The library that we use supports the Fetch, XHR, Node, Axios and Angular clients.
Once we have added the package to package.json, we will add this script to generate the client using swagger.json (generated in previous step).

Consume the API client in the frontend application using the published npm package
This client can now be consumed:
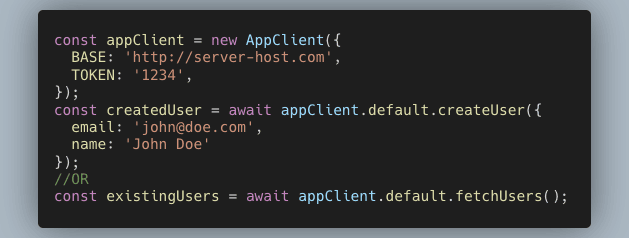
We are completely abstracted from the underlying API implementation, and that’s awesome. The request/response models are also auto-generated, so there’s no need for us to maintain them on the client code.
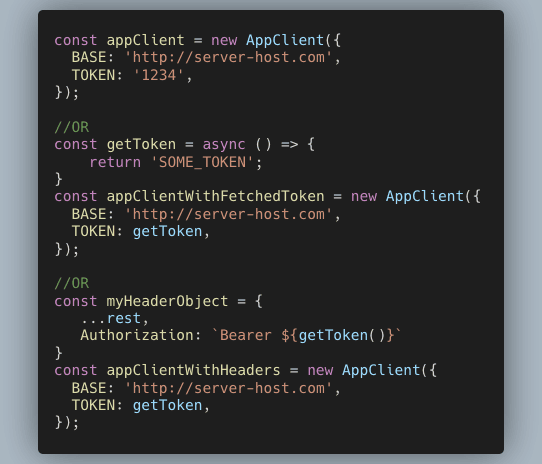
The client can be provided the default configuration using the constructor arg. The config looks like this:
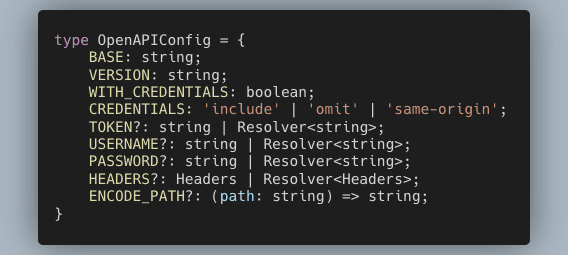
For instance, an auth token can be injected for all the requests like this:
Publish the package using GitHub actions
We have looked into how the client can be consumed, but there is still one piece pending. We have to publish the client to an npm repository. We will use GitHub Actions to automate the entire workflow.
Remember that we already have all the scripts ready in our package.json. So, if you plan to automate this with any other CI, that should be straightforward.
To begin, we’ll have to configure an npm to point to the GitHub npm repository. That can be done by adding a .npmrc file.

We’ll also need to create an access token for the scripts to be able to talk to the npm repository. This can be done by adding a new personal access token. We will need a subset of these permissions for our token to work:

We can now add this token as a repository secret. In our case, we have assigned the token to MY_NPM_AUTH_TOKEN which is referred to inside .npmrc.
That’s all the setup we need! Let’s get started on the Github Actions workflow.
The logical flow of our workflow is:
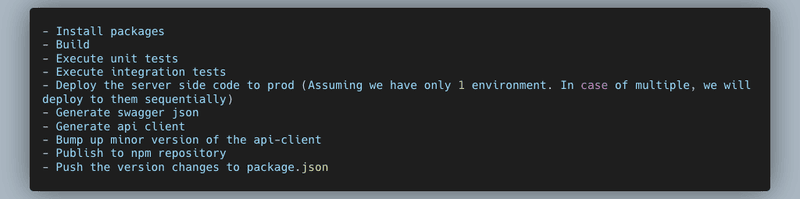
In production-grade applications, we will have unit + integration + smoke tests that will tell us if the application’s code is healthy. Also, there will be health checks performed post-deployment to assess if the server is ready to accept incoming traffic. For these reasons, it makes sense to generate the API client once everything is ready. There’s no point in publishing an API client for a failed deployment, because it’s not going to work.
The workflow

Note: Since we do not have integration tests or an actual deployment, they are commented in the above snippet.
Final thoughts and summary
Why did we bother creating a client library?
This is a convenient mechanism to increase adoption and reduce implementation effort for developers. It keeps the client agnostic of the underlying API implementation, and as the client is typed, there is no documentation required to consume the library.
Why did we bother with all this automation?
For starters, one client library certainly isn’t enough. APIs often offer multiple client libraries for many popular programming languages. After all, a client library is only any good for developers if it’s written in the language they want to use.
The other reason you’d want to automate the generation of client libraries is to ensure that they’re kept up to date. An outdated client library is no good. In fact, it’s probably better to have no client libraries at all than to have outdated ones.
Although it may take a fair bit of effort to set up an automated client library generation, it immediately solves both problems. With an automated system in place, you can create client libraries for as many programming languages as you want, as often as you want.
For this blog post, we used a NestJS-Swagger integration to get us started. However, this solution can be extended to any server side programming language. OpenAPI Generator has a wide range of support for almost all programming languages. We chose OpenAPI-TypeScript-CodeGen for the simplicity in configuring it for a frontend stack.
Everything that we talked about can be found in this GitHub repo.


